
Done using GIMP 2.10.24 on Kubuntu Linux 20.04 LTS
Dodge and Burn are concepts you find in many graphics programs, and the names are not at all intuitive. Dodge means to lighten, and Burn means to darken. They exist as a Tool in the Paint Tools section called Dodge/Burn, with a keyboard shortcut of Shift+D. They show up as Modes available for other Paint tools. You select a Paint tool, then look to the Properties area just under the Tools area, and you will see Mode as the first option. By default the tools open in Normal Mode, but you can select Dodge or Burn. In fact, the modes we have looked at for Layers are generally available as Tool modes as well, the differences being
- Layer modes apply the effect to the entire layer, whereas Tool modes can be applied to specific areas within an image by using the tool.
- Layer modes involve the interaction of two layers, whereas Tool modes can be applied to one layer by itself.
I haven’t always pointed that out in the Layer mode discussions, but it is worth keeping in mind, and I just pointed it out here.
Dodge and Burn are useful tools you will find in many graphics programs, and deserve a more in-depth look here. I plan to cover not only the Layer modes, but also the Dodge/Burn tool. You will find them very handy and use them a lot if you get into graphics. They are frequent tools used in Photo retouching, which is of course a major reason for why I got into GIMP, and where I plan to take this series.
Tool Properties (aka Tool Options)
I want to start with a look at Tool Properties, sometimes referred to as Tool Options, because they are important. (Note: GIMP calls them Tool Options, but in other programs like LibreOffice the terminology of Properties is used. Either way, we are talking about the same thing.) Many of them are the same for all of the Paint Tools, including Dodge/Burn, but some are specific. To get a closer look, click on the tab on top of the Tool Options window and drag to undock it, then pull on the edges to expand it to comfortable viewing size, like this:

Now, if you have “undocked” this, and then close GIMP, when you reopen GIMP you may not see this. But just go to the Windows menu, then to Dockable Dialogs, and select Tool Options as what you want to open, This works for all of the Dockable Dialogs, such as the Layers window, etc.
I only want to look at a few of the options here. Starting from the top, we have:
- The Title bar for this window (i.e. Tool Options)
- The Open button for the window. This serves as a handy tab for docking or undocking the Window.
- Mode – If you click on the Dropdown here you will see the same list of modes as you would see for the Layer modes. The difference is that Layer Modes apply the effect to entire layer, whereas the modes on a Paint Tool are applied to specific ares by how you use the tool.
- Next to the Mode dropdown is a button to Switch Groups of Modes. The default group is all of the new modes in GIMP 2.10, but if you want the modes from an earlier version of GIMP, you can switch to the Legacy modes. I generally stick with the Default group for this.
- Opacity – By default this is set at 100%, but in some cases, such as photo retouching, you may want to apply an effect with reduced opacity, and you can control that here.
- Brush – This is where you select the Brush you want to use. One of the critical decisions here is whether you want to use a brush with a hard edge or a soft (i.e. fuzzy) edge. That is controlled by the Hardness setting, which ranges from 0.25 to 1.00 in increments of 0.25. If you click the Button you can switch brushes.
- Size – You can control this with the slider, by typing in a new number, or you can hold down the control key while using the Mouse wheel. I find the latter tends to be most convenient because I can get the size right with the brush on the canvas.
- Aspect Ratio – By default, the Brush is I have selected here is circular, but you can make it more of an oval with this setting.
- Spacing – You can think of that the Paint tools do as a series of stamps on the image. You can do a single stamp by clicking on the image, but when you click-and-drag, it is a series of stamps, normally spaced so close you don’t notice. But you can increase the spacing and get a series of separated stamps.
That is enough for the Tool Options for now. If you want more, go to the GIMP 2.10 Documentation.
The Dodge/Burn Tool
The Dodge/Burn tool is another Paint tool, but what it does is to lighten (Dodge) or darken (Burn) the colors in your image. The key setting to look for here is that you can set it to only affect a certain range of brightness in the image, from Shadows to Midtones to Highlights. So if you had an image where the shadows were very dark and you wanted to bring them out a bit more, you could use the Dodge setting and Shadows to do this without affecting other parts of the image. These options show up at the bottom of the Tool Options.

So, with Dodge and Shadows selected, I opened up the Landscape image we used previously in looking at Layer Masks because it has a lot of shadows.

Since I always work non-destructively, I first duplicated the layer and worked on the Duplicate. I set my Opacity on the tool to 35, and my size to 30, and Dodged some of the shadows in this image.

If you look closely you can see the shadow areas are a bit lighter. But I also did a little in the brighter area in the upper right, and you really can’t tell.
Burn does the opposite, it darkens, but it has the same three options for Shadows, Midtones, and Highlights. This time I went back to the Toy image:

Again, I worked it non-destructively by duplicating the layer and applying my edits to the Duplicate. This time I seet the opacity to 50, but kept the size at 30.

I applied the Burn to the Wizard’s hat and the the stand for the crystal ball, but the effect was really subtle. I then burned a little patch of the background in the upper right just as an example. The lighter the area is on the image, the more you will see the effect here.
Dodge and Burn Layer Modes
So, what happens if we do this as a Layer mode? We’ll first go to the Dodge Layer Mode. Like all Layer Modes, it requires two layers to work, and the order really matters again, unlike with the commutative modes. Dodge lightens using this formula:

In this formula, remember that M represents the Upper layer (Mask) and I represents the lower layer (Image). So each pixel in the lower layer is multiplied by 256, then divided by the inverse of the pixel in the upper layer plus one. The result is not generally useful. With the dog as the upper layer and the toy as the lower layer, this is the result:

As you see the resulting image is definitely lighter, but pretty strange. So what about Burn? It uses the formula
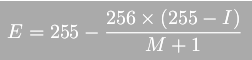
The net effect, of course, is to darken the image.

Summary
The basic idea of these techniques is to solve as problem you often encounter in photography, which is that detail can be lost in two opposite ways. In some photos the shadows are so dark you can’t really see much detail. In other photos, the exposure may have blown out the detail with too much brightness. The Dodge tool can help bring back some of the shadow details, while the Burn tool can bring back detail from over-exposed or excessively bright images. So they are extremely useful in photo retouching, and you definitely should get comfortable using them. But the Layer modes for Dodge and Burn are not particularly useful. As the Documentation says with respect to Burn:
In photography, burning is a technique used in a darkroom to increase the exposure in particular areas of the image. This brings out details in the highlights. When used for this purpose, burn may work best on Grayscale images and with a painting tool, rather than as a layer mode.
https://docs.gimp.org/2.10/en/gimp-concepts-layer-modes.html
So I think that is good advice. Next we will look at the other Darken Layer Modes.
For an example of using this in a photo retouch, check out this tutorial from Chris Parker.
 Save as PDF
